Faculty Support

Pedagogy
Access resources that provide tools for teaching best practices. Support your students with equitable, inclusive and engaging lessons.

Online Content
From website authoring to online course development, the PDC has tons of resources for you to choose from!

Tech Tools
There are many software applications that we use on campus to do our jobs effectively, and the list is growing all the time!

Professional Development
Check out the in-house and external Professional Development training opportunities.
Pedagogy
Equity and Inclusion
Equity and inclusion is at the forefront of teaching and learning at Hartnell College. Use the resources below to learn more about becoming a champion for equity and inclusion in your online courses and beyond. You may also wish to learn more about Hartnell College's Office of Equity Program, the LGBTQIA+ alliance, or Umoja community resources.
Resources
Accessibility & Instructional Design Resources: Learn how to make your online courses accessible to all of your students. See Accessibility.
Canvas Student Support Resource Page: Help your students by providing them with additional Canvas support resources. You can also direct them to the Panther Learning Labs, or even give them access to the Quest for Success online, self-paced support course!
Did you know that all online students have access to a FREE resource through the OEI that offers support for new online students? For students to take advantage of this resource, they will need to self-enroll in the Hartnell College Quest for Success online course. You can easily send your students the information they need to enroll in this free resource by posting the following announcement in your course:
---
Welcome students,
You have registered for an online course that is accompanied by a free online Quest for Success Program. This program is designed to increase your success in your online course. Please follow the directions below to register and complete the Quest Program. It allows you to save your work and return to it later. At the conclusion, you will have an individualized report that gives you feedback and resources to help you become even more successful in your online classes.
Steps to complete your self-enrollment:
- Log in to Canvas here: https://hartnell.instructure.com. Please use your full student ID# as your username and your 8-digit date of birth as your initial password (example: January 1st, 1980 would be 01011980).
- Go to this link to self-enroll: https://hartnell.instructure.com/enroll/4DBRCN
- Click the button "Enroll in Course"
- Click the button "Go To Course"
- Complete the modules
CAST: Learn more about this organization that promotes the Universal Design for Learning framework.
CUE Syllabus Review Tool: Use this Syllabus re-design inquiry guide created by the Center for Urban Education (CUE) to re-design your Syllabus and other course content to promote racial and ethnic equity and inclusion.
Peralta Equity Rubric: Here's another equity-centered rubric that can be used to evaluate your own courses and make the online learning experience more equitable for all students.
Pronouns/Names in Canvas: Did you know students (and you!) can set personal pronouns in Canvas? Watch this tutorial video to learn how! You can also change your name to reflect your identity in your Canvas account settings.
Vision Resource Center: Use the *free* resources provided by the Chancellor's office to learn more about equity and inclusion, including webinars on state initiatives, on-demand professional development courses, and more!
Want even more equity-focused training, including interactive online professional development courses led by experts in the field? Check out Educators 4 Equity and Justice.
INSTRUCTIONAL VIDEO
What is a Flipped Classroom?
A flipped classroom is structured around the idea that lecture or direct instruction is not the best use of class time. Instead students encounter information before class, freeing class time for activities that involve higher order thinking.
Benefits of a Flipped Classroom
- it's flexible
- students can learn at their own pace
- students take responsibility for their learning
- students learn rather than encounter material in class
- increased collaboration between students
- more opportunities for higher level learning
Methods for "Flipping" a Classroom
Students can view lessons before class, then work on learning activities with the instructor. Incentivize students to watch the video by starting class with a low-stakes quiz or brief discussion summarizing main points
Written Lessons
- Use “Content Pages” to deliver lecture content
- Enrich content with photos and/or external learning content, like Khan Academy, Films on Demand, or YouTube
- Samples:
Recorded Lessons
- Create a ConferZoom (or Screencast-o-Matic) account
- Record your lectures
- Upload to YouTube and add Captions
- Post YouTube links in Canvas
- Instructions:
Best Practices for Lecture Capture
- Do
- Use a script (convenience & ADA compliance)
- Project confidence (eye contact, speak clearly)
- Practice!
- Don't
- Simply record a live lecture
- Just read the script with no enthusiasm for the content
- Record where there are external sounds (pets, cars)
Instructional Design
To get live support and feedback on your online, hybrid, or web-enhanced courses, schedule an Instructional Design Consultation today! This consultation will involve an informal course review where you will receive feedback from an instructional technologist to help improve your course.
Here are some of the areas where you may receive support and feedback:
- Creating virtual lectures
- Using specific technical tools within Canvas
- Engaging & interacting with students online
- Streamlining & improving your content for clarity & usability
- Aligning your content with current industry standards & best practices
- Creating accessible content
- and much more!
When you're ready, schedule an appointment.
OER
Hartnell College is committed to improving student access and equity, and providing low or no-cost textbooks is one small step towards closing the achievement gap. To assist faculty with the selection and adoption of affordable materials, below is a collection of open educational resources (OER) that you can adapt for your own courses!
Guides & Documents
California Virtual Campus OER Information: Everything you could possibly need! Access resources, research and guidelines, information about zero cost textbooks and more.
Hartnell Resources: OER Resources Canvas Course (clicking the link will allow Hartnell Faculty only to self-enroll in the course)
Open Textbook Resources: CoolforEd, College Open Textbooks, Flat World Knowledge, Connexions, OER Commons, Wikibooks, Questia, The Orange Grove, Global Text Project, Saylor Foundation, 20 Million Minds, OpenStax, The Assayer, Community College Consortium for Open Educational Resources
Additional Resources (non-textbook): Khan Academy, Librivox, Flipping Physics, MIT Open Courseware, TED Talks and TED Ed, PBS Media, Teacher YouTube, Vimeo, MERLOT
Learn more about this statewide initiative, the online course exchange and how to join.
Regular Substantive Interaction (RSI)
interactions to be considered RSI, they must meet the following characteristics:
- Initiated by the Instructor - To count as ‘regular and substantive,’ interactions need to be started by you. This doesn’t mean students should be discouraged from contacting you or asking questions – far from it! But you should expect to take an active part in initiating and guiding a range of interactions with your students throughout the quarter. This ensures that interactions are not optional and left up to each student’s individual discretion; rather, they are an integral part of your instructional plan for the course.
- Frequent and Consistent - Interactions with students should be reasonably frequent and consistently repeated throughout the quarter. This means that once a course begins, long intervals of time shouldn’t pass between the interactions you initiate with students. The mode of interaction may vary throughout the course, depending on your aims and the needs of your students, but the regular cadence of interactions you establish should remain as consistent as possible. Daily communication isn’t required, but at a minimum you should seek to interact with every student at least once each week and you should log in to the course every 1-2 days.
- Focused on The Course Subject - Interactions should be connected to the subject of the course and contribute to the students’ progress toward course, program, and college learning objectives. tine procedural interactions, such as reminders of upcoming deadlines, aren’t ‘substantive’ on their own; neither are activities like assigning grades, unless they are accompanied by personalized feedback or suggestions for improvement. This doesn’t mean that interactions designed to welcome students or build classroom community aren’t important, merely that they aren’t sufficient by themselves.
Guides & Documents
You can find more in depth information in the article Interpreting what is Required for Regular and Substantive Interaction.
Watch the tutorial on Establishing Regular & Effective Contact.(Updated 2020)
Rubrics
Rubrics help instructors set clear expectations for student's learning. They help instructors share feedback more easily and grade more consistently. There are two main rubric styles; holistic and analytic.
Holistic
Holistic rubrics list three to five levels of performance along with a broad description of the characteristics that define each level. The goal of a holistic rubric is to provide feedback on what the learner is able to deminstrate, rather than what she/he/they/them cannot do.
Analytic
An analytic rubric features the critera (columns) and level of achievement (rows). When scoring with an analytic rubric each of the criteria is scored individually. The goal of an analytic rubric is to provide useful feedback on areas of strength and weakness.
Guides & Documents
Create your own rubrics using the Rubistar Tool to Generate Rubrics

ONLINE CONTENT
Accessibility Support
When you design with accessibility in mind, everyone benefits! We all want to have accessible, effective, and appealing classes and webpages. Instructional design, or Instructional systems design/technology (ISD/IST), is the practice of creating instructional experiences that make learning easier.
Whether you're here to learn more about making your webpages more accessible or your online classes more user-friendly, the Instructional Technology team at Hartnell are here to help! We have advanced degrees and experience in the field, and can help guide you.
Support for making your web content accessible with the Accessible Content Request Form.
Accessible Documents
Creating Accessible Documents: PowerPoint, Word, Making an Accessible PDF (and Adobe Guide to Accessible PDFs, Convert from Word to PDF, OCR text info and how to run the Adobe Accessibility Checker), links, tables, math equations, and other types of content
Captioning Resources
Amara Free Subtitling Service: Use this service to manually type in captions for any YouTube or Vimeo videos (even if you don't own the videos yourself!)
3CMedia services (grant-sponsored video captioning)
Request captioning for videos you don't own (paid video captioning service)
YouTube Captioning Quick Start Guide
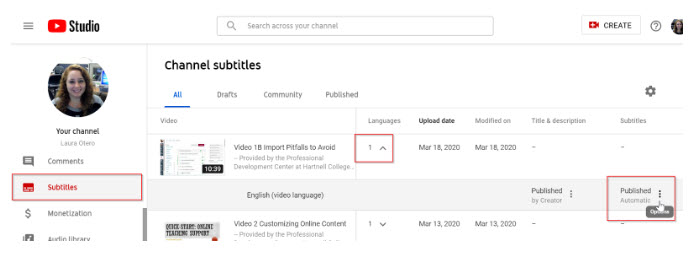
This guide will show you how to login to your YouTube channel, upload a videos, edit captions.
Go to www.youtube.com, log in with your Hartnell Gmail address, then follow the prompts to set up your channel. This is a one-time set up process!
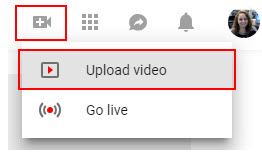
- Once you’ve logged in, click the upload icon (top right) and select “Upload video”:
- Click on “Select files to upload”, then find your video file in your computer
- Set your video privacy to “Unlisted” to allow anyone with the link to view the video WITHOUT being able to find it on YouTube by accident!
Great work! As your video uploads, you can add your video title, description, and more.
- To edit your video, go to studio.youtube.com and select “Subtitles” from the left menu
- You’ll see a list of your videos. Under the “Languages” header, click the downward-facing
arrow. You’ll see a column for Title & Description and another for Subtitles. If the word “Add” appears, you will need to wait up to 1 hour for the automatic
captions to appear! Here’s what will appear when ready to edit:
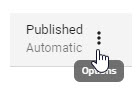
- Hover your mouse over the three vertical dots and the word “Options” will appear. Click the three dots and select “Edit on Classic Studio”.
- Click the “Edit” icon button and edit any text as needed, then click “Save changes”.
- Now you’ll see two sets of captions: the edited captions, and the automatic captions:
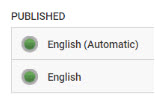
- Click on the automatic captions, then click “Unpublish” on the next screen so that your edited captions will display instead of the automatic captions.
That’s it! Your captions are now live on your new video! You can now share your captioned video link in Canvas, on the website, or through email.
Screenshot 1:
Canvas LMS
Canvas is the learning management system (LMS) used at Hartnell to host and deliver course content online. Use it with your face-to-face, hybrid, or fully online courses to take attendance, distribute announcements, post course materials, communicate grades, and so much more! Canvas was adopted by the CCC Online Education Initiative (OEI), and is now in use at the majority of California Community Colleges. Browse the instructional materials below, or register for a fully online training course or face-to-face workshop to discover its capabilities!
For technical support, contact the LMS Administrator. For evening or weekend support, call the Canvas hotline at (877) 917-5953. Is Canvas down? Check the status here: http://status.instructure.com, or check for known issues instead.
ConferZoom
ConferZoom is web conferencing software that you can use to host virtual meetings or even lectures via computer or telephone. Features include: sharing your computer screen, using collaborative virtual whiteboards, live chat and file sharing, recording and uploading your sessions to the cloud, and more!
Why am I limited to 40 minutes? Don't worry, you're not! Just re-register for ConferZoom by following the steps in the "Register for ConferZoom" video, and you will receive an email confirming your free account upgrade!
Guides and Documents
Account set up: Register for a free account, ConferZoom full user guide
ConferZoom Security: Avoid "Zoom Bombing" with these essential security practices.
ConferZoom Support Guides: View this page for a collection of instructional videos and written support guides.
Tips & Tricks: Add and edit the automatic closed captioning, Create Separate Audio Recording Files, Edit Advanced Recording Settings, Request live closed captioning, use ConferZoom to flip your classroom (learn more about this by registering for the Introduction to Teaching Online course)
Please note: To complete the following steps, you will need to be IN a ConferNow meeting.
-
Click the upward arrow right next to the “Start Video” or “Stop Video” icon
-
Select “Video Settings…”
-
Checkmark the box next to “Always turn off video when joining meeting” and exit the settings (there is no save option- it will automatically save!)
That’s it! Next time you’re in a meeting, the video won’t automatically start up!
-
Log into conferzoom.org
-
Click on “Meetings”, and select “Start” next to your lecture capture meeting room
-
Join with computer audio OR by phone
-
Click “Record” to begin recording
-
Share your screen if needed
-
Stop recording and end the meeting, and your recording will be available to download under “Recordings” at conferzoom.org
-
Sign in at conferzoom.org
-
Click on “Meetings” (left navigation menu)
-
Click “Schedule a New Meeting”
-
Add title (“Lecture Capture”), then checkmark “Recurring meeting” and select “No Fixed Time” under Recurrence
-
Turn video on for the host & allow “both” for audio
-
Click “Save”
Why? Because YouTube make it easy to add captions and then post in Canvas!
- Download the recording from conferzoom.org
- Login to YouTube using your Hartnell gmail account
- Set up your YouTube channel (if needed)
- Upload video and add captions (See Captions)
- Copy your link to add to Canvas!
Troubleshooting: For support, or if you accidentally signed up for a Zoom trial account rather than the ConferZoom premium account sponsored by the Chancellor's office, contact ConferZoom live support, or refer to the following guides: Video Not Working, Trouble with the ConferZoom LTI, Other General Zoom Troubleshooting.
Instructional Videos
Newer videos: Register for ConferZoom, Create a Meeting & Manage your Meeting (all in one video), Download your Zoom Recording, Upload to YouTube & Post in Canvas (all in one video), Using Breakout Rooms, & Use ConferZoom (LTI) in your Canvas Courses (or How to Lose the LTI if you don't like it instead!)
Older videos: Set up your account & schedule a meeting, and Record ConferZoom lectures and post manually in Canvas
ConferZoom Tips & Tricks Video Series: Turning off automatic recording passwords, Securing your ConferZoom Meetings (avoid Zoom Bombing)
Tech Tools

Adobe Acrobat DC
Adobe Acrobat DC is a premium digital document software used to view, create, and save files as PDFs. PDF (portable document format) files are great for sharing information on our website as it puts documents (like Word documents) into a more universal format, and it's available on your Hartnell computer and virtual desktop. Adobe Acrobat DC comes with several helpful features, including requesting digital signatures, making your documents accessible, and creating fillable forms. View the training materials below, or you can register for a live training workshop or online course to learn how to use this software!
Guides
You can use Adobe Acrobat Pro X on any Hartnell computer to make changes to PDFs, including inserting and extracting pages from a document, editing text, adding hyperlinks, and converting PDFs to Word documents, Excel spreadsheets, and images. This guide will cover how to make all of those changes!
NOTE: Adobe Acrobat Pro X is also available on the PDC virtual desktop. Use the VMWare guide if you need help logging in to your virtual desktop.
- Start Adobe Acrobat Pro X (Start Menu > All Programs > Adobe Acrobat Pro X)
- Open the document to edit (File > Open)
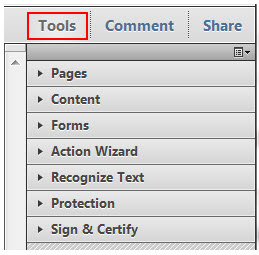
- Click to open the “Tools” menu (top right):
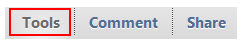
- In the “Tools” menu, select “Pages”
- To INSERT a page, click “Insert from file”, find the file in your computer that you’d like to add, then click “Select” to add it to your document.
- To EXTRACT a page, click “Extract”, select the page number you’d like to separate from the document, and click “OK”.
- Don’t forget to save your document when you’re finished!
- Start Adobe Acrobat Pro X (Start Menu > All Programs > Adobe Acrobat Pro X)
- Open the document to edit (File > Open)
- Click to open the “Tools” menu (top right):
- In the “Tools” menu, select “Content”
- To EDIT document text, select “Edit Document Text”, then click anywhere you find text in the document and edit the text by typing/deleting.
- To ADD a link, select “Link”, then click and drag the mouse to highlight the area where you want a link. Choose the type of link you need (“open a web page” will give you a hyperlink to any website), click “Next”, enter your URL (like www.hartnell.edu), then click “OK”.
- Remember to save your document when you’re finished editing text and adding links!
- Start Adobe Acrobat Pro X (Start Menu > All Programs > Adobe Acrobat Pro X)
- Open the document to edit (File > Open)
- Click “File”, then “Save As…”
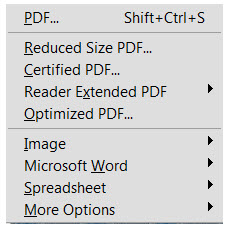
- To convert your document to an IMAGE, select “Image” and choose the image type (JPEG or PNG are the recommended file types)
- To convert your document to a WORD DOCUMENT, select “Microsoft Word” and choose “Word Document”
- To convert your document to an EXCEL SPREADSHEET, select “Spreadsheet” and choose “Microsoft Excel Workbook”
- Click “Save” after you’ve made your selection and your document will be saved in its new format. If you’ve made any changes to your PDF before you hit “Save As…”, you may want to save the original document once more as a PDF!
Accessibility: Creating Accessible PDFs & Using the Adobe PDF Accessibility Checker

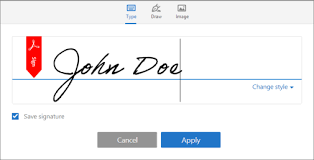
Adobe Sign (Digital Signatures)
For Form Signers
- How to Sign Documents with Adobe Sign Instructional Video
- How to Sign Documents with Adobe Sign Written Guide
For Form Senders
- Hartnell College Adobe Sign Training Video
- Send Documents for Signature with Adobe Acrobat Sign Video
- Delegate someone else to sign a document Video
Guides
Hartnell College employees can now use Adobe Sign to electronically sign documents, send documents for electronic signatures, and manage and verify documents sent for signatures. Get started by viewing the training video and follow the steps below! For more help, view additional Adobe tutorial videos.
- Sign into the Adobe Sign portal at https://na2.documents.adobe.com/account/homeJS
- On the Adobe Sign login screen, type hartnell.edu as your username and click Continue. A new Hartnell College screen will load, and you will need to enter your Hartnell username (employee ID number) and your normal computer password to login.
You now have access to Adobe Sign!
If someone has sent you a form to sign, it will arrive in an email entitled Signature requested on “___” (the highlighted space is the document title). This email will include the name and Hartnell College email address of the requestor. When you’re ready to sign, click Review and sign and follow the on-screen directions. View the signer experience.
- Sign into the Adobe Sign portal: https://na2.documents.adobe.com/account/homeJS
- To send a document for signature, click the Request signatures blue button (or click the Send tab at the top left of the page).
- Type in the Hartnell email address for the person (or multiple people) who need to sign the document. Enter the name of the form to sign, then click Add Files to upload the forms to sign from your computer (or drag and drop the files directly into the Files box). You can upload PDFs (fillable or not) and Word documents (converted to PDF automatically).
- Below the Files box, add a checkmark next to Preview & Add Signature Fields, then click Next.
- Add a signature field by clicking the Signature item (under “Signature Fields” to the right). Drag and drop each field onto the form. If multiple signers are requested, right-click each field and select Edit to assign to specific signers. If needed, add fillable fields to your form by dragging and dropping any “Data Field” items onto the form, or click to the auto-detect field icon to have fields auto-detected for you:
- When the form is ready, click Send to distribute the form for signatures.
Adobe Fillable Forms
Create fillable and saveable forms using Adobe Acrobat Pro DC! If you do not have Pro DC installed, access it on the PDC virtual desktop.
Guide
- Create a form using Word or Excel, or scan an existing form in as a PDF.
- To add professional form items like checkboxes or radio buttons in a Word 2016 document, click on the Home tab, then select Options.
- Click on Customize Ribbon, then checkmark Developer (in the Customize the Ribbon item list), and click OK.
- Click the new Developer tab, then select the checkbox icon to insert:
- Save your document as a Word file, then as a PDF and go to step two.
- Once your document is ready to be converted to a form, open Adobe Acrobat DC.
- If prompted, enter the username hartnell.edu and no password, then click Sign In
- You’ll be redirected to the official Hartnell College login screen where you’ll enter your Hartnell employee ID number (username) and computer/PAWS password
- NOTE: Do not reset your password if you can’t log in! This will reset your password for everything (PAWS, printers, computer, email). For support, call IT Help at (831) 755-6789.
- Once you’ve logged in, select More Tools (right toolbar), then find Prepare Form and click Add to add this item to your Adobe shortcut menu, then select Open.
- Choose Select a file and browse for your PDF file in your computer, select the file and click Open, then click Start. The form fields will be detected automatically!
Form fields will be detected automatically, but you can edit them or add additional fields:
- To edit, right click each field and select Properties. This will allow you to change the field’s appearance (like changing colors or adding borders, etc.), or add options (like default field values), add formatting options (like making the field into a number with currency formatting) or creating a calculating field (like making the field show a sum total).
- To add new fields, select from the items in the toolbar at the top (hover over each
to see what it is):

- Once you’ve selected the item to add to your form (like a checkbox item), click and drag to cover the area where you’d like the item to go (like over a blank box that wasn’t auto-detected as a form field). Edit any properties you’d like (refer to 1 above).
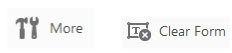
- Once you’ve edited your form and are ready to finish, click the Preview button—to return to edit mode, click the Edit button. When previewing the form, test any fields but remember to clear the form before saving! To clear the form, click Edit and select the More icon, then click the Clear Form icon (only available in edit mode):
- To finish, click the Close button (next to Preview), then click File, then Save as Other, then Reader Extended PDF, then Enable More Tools (includes form fill-in & save)... and click Save Now to save your fillable, saveable form:

NOTE: To edit a fillable form after saving it with Step 3, open your form and click “File”, then “Save a Copy”. This will create an unsaveable form, but it will allow you to edit it, and you can then follow Step 3 again to make it fillable and saveable!
That’s it! You now have a fillable (and saveable) PDF form.

Adobe Photoshop
Photoshop is a premium image editing software that may be available on your Hartnell computer (it is no longer being installed on the newer systems). If you do not have this program installed, use Pixlr photo editing software instead!
Guides
Photoshop for Beginners (Quick Start Guide)

Adobe Portfolio Guide: EOPS
Adobe Portfolios simplify records by storing many documents in one file. You can follow the steps in this guide to create student Portfolios, then save them onto a shared network drive, keeping student files secure behind the Hartnell College firewall.
Before you begin, make sure you scan or save these documents onto your computer for each student Portfolio:
- EOPS Application
- Student Responsibility Contract
- Educational Plan
- Transcript(s)
- Progress Report
- Orientation Quiz
- Contact Sheet
- Miscellaneous (letters of probation, disqualifications, transfer information, etc.)
- Other:
Once you have all of your documents ready, you can get started with Step One!
Guide
- Open Adobe Acrobat X Pro:

- Click “Start”, then “All Programs”, then select “Adobe Acrobat X Pro”.
- Once the program is open, create the Portfolio:
- Select “Create PDF Portfolio”, choose the “Grid” layout, then click “Finish”.
Now that you have your Portfolio ready, you can add files and even entire folders to it:
- Add a file [Fig 1]:
- Click “Layout”, then “Add Files”, select the file to add, then click “OK”.
- Add files one at a time, unless you’d like to add an entire folder (option below)
- NOTE: You can add any filetype (PDFs, Word docs, Excel spreadsheets)
- Add a folder [Fig 2]:
- Click “Layout”, then “Add Folder”, select the folder to add, then click “OK”.
- NOTE: This is different than creating a folder in the Portfolio, which you can do by clicking “Create Folder”. Folders within the Portfolio can help you organize the Portfolio better.
- Add a webpage [Fig 3]:
- Click “Add Web Content”, enter a name for the web content and a description, then type or paste the link into the “URL” field.
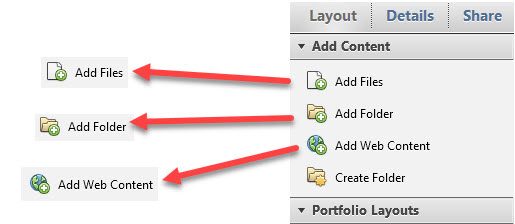
[Fig 1] Adding files to the Portfolio:
[Fig 2] Adding folders to the Portfolio:
[Fig 3] Adding webpages to the Portfolio:
NOTE: You can use this to add links to helpful webpages like the FAFSA webpage, an admissions page, or even a YouTube video link.
- To save, click “File”, then “Save Portfolio”, then find the appropriate shared network drive under “Computer”.
- NOTE: The EOPS shared network drive can be found under “Computer”, “G:”, “Usr”, “BIN”, “EOPS-APP”, “.Student Files”.
- Type a filename based on the appropriate naming convention in your department, then click “Save”.
NOTE: The EOPS naming convention is: Doe, John-1234567
That’s it! You now know how to create an Adobe Portfolio, add files to it, and save it onto the shared network drive.

Ellucian (Colleague)
Colleague by Ellucian (formerly known as Datatel) is the primary data system used at Hartnell College. This is what you'll use to enter and access most of the "big data" on campus, and this is where the information from the PAWS system is stored. You'll find the shortcut to access Colleague on your Hartnell computer desktop, and once you've been approved to gain access to the system, you'll need to enter your PAWS username and password to log in.
Guides & Resources
Colleague Login: This link will only work if you're currently using the campus network. To access from another location, login to your virtual desktop
Sign up for free access to the Colleague support resources offered by Ellucian.
- Ellucian Customer Support Center
- Sign in for one-stop access to your personalized support resources, including case management, training, software downloads, and documentation.
- California Community Colleges (CCC) eCommunity
- Ellucian Colleague Training (requires Ellucian account; sign up for free above): All Colleague users at Hartnell
can access a library of online, self-paced training videos. Topics include Student
System, Finance, Human Resources, Scheduling, and more!
- Start here!
Colleague Navigation Basics Online Course: This comprehensive online course details how to navigate in Colleague and many of its features! To register, make sure to login to the customer support center (linked above). - CCC Colleague Training Portal
- CCC Colleague Learning Plans
- Start here!
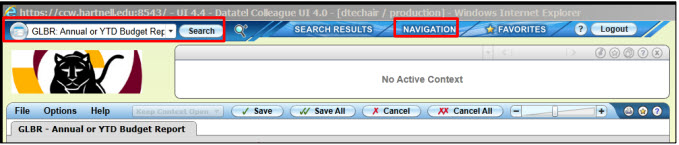
Ellucian GLBR (Annual or YTD) Budget Reports
View steps for running the GLBR budget reports. Please note: these items may be out of date, so if you still have questions, submit an IT Request in the Campus Services Portal.
Log-in to Colleague and type the neumonic “GLBR” in the form search box, then press “Enter”. You can also select this report via the “Navigation” tab at the top of the screen.
Mandatory fields are highlighted in red.
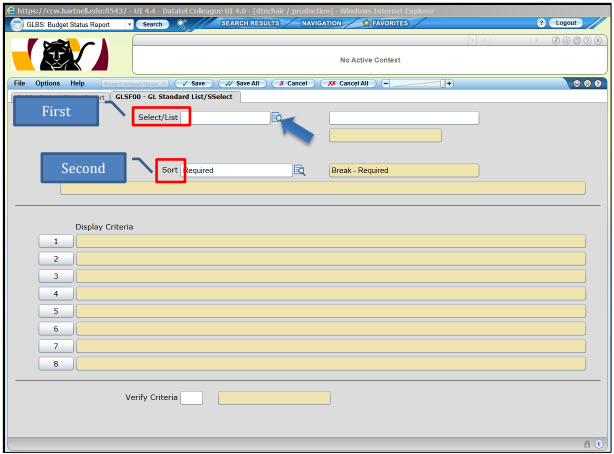
 After pressing “F2” or clicking the magnifying glass, you will see the following screen.
This screen is used to (first) select the data the report will contain (Select/List)
and (second) how the report will be displayed (Sort).
After pressing “F2” or clicking the magnifying glass, you will see the following screen.
This screen is used to (first) select the data the report will contain (Select/List)
and (second) how the report will be displayed (Sort).
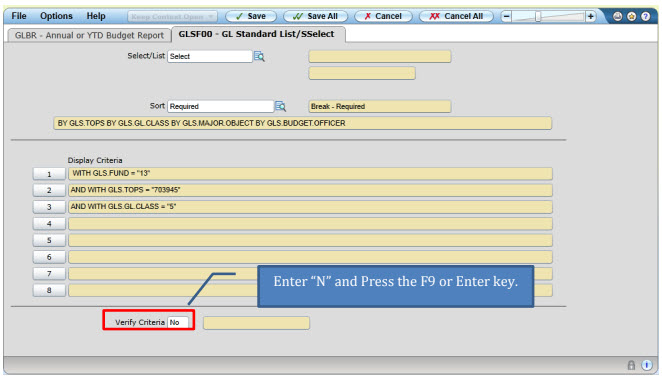
Select/List: Pick The Data Your Report Will Contain
In the “Select/List” field, click the icon with the magnifying glass, or press the F2 key. The following screen will open (see next page). On this screen you will determine what data your report will contain. Input the fund, area, location, TOPS, or Object of the budget account you want in your report.
Example
I want to run a GLBR report using the following information:
- Fund “13” or the Restricted Fund (grants)
- TOP code “703945” for CTE Community Collaborative #5
- Object codes beginning with “5” or expenditures
Please note, you can input any portion of the budget account number, but keep in mind that Colleague will capture only the accounts that include the codes you’ve input above (In this example, only accounts that have the Fund = 13, TOP code = 703945, and Object Codes = 5xxxx - Expenses).
 Once you press F9, or enter, you will return to the previous screen with your choices
filled in the “Display Criteria”, as seen below.
Once you press F9, or enter, you will return to the previous screen with your choices
filled in the “Display Criteria”, as seen below.
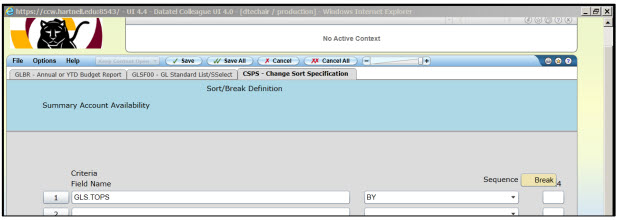
 Sort: Pick How Your Data Will Display
In the “Sort” field, click the icon with the magnifying glass, or press the F2 key. The following screen will open. On this screen you can adjust (or sort) how the report is displayed.
Example
I would like to sort my data based on the TOP code. To do so, I need to delete:
- (1) GLS. Budget Officer
- (2) GLS.FUND
- (3) GLS.AREA
- (4) GLS.LOCATION
- (6) GLS.OBJECT
To delete these fields from the screen, I click the number, and then select “Delete”, and then “Delete” again. (see next page). Repeat until deleted 1, 2, 3, 4, and 6. In this example, we sort by the TOP code (703945). This means the report will be sorted/displayed by all accounts with 703945 first. This is best when you are running more than one TOP code. Please note: you can also sort by GLS.FUND if you run only one TOP code

After I have deleted 1, 2, 3, 4, and 6 – I will see the following screen:
Next, I will add additional sort criteria. For this example, I want to add the following additional sort criteria:
- Expenditures or GLS.GL.CLASS
- GLS.MAJOR.OBJECT
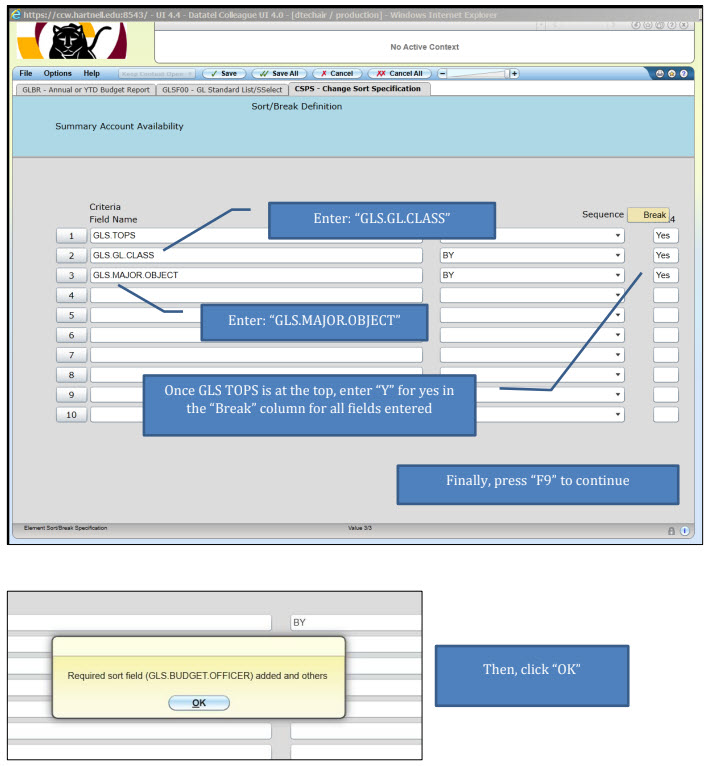
You will return to the previous screen with both the Select/List and Sort information populated.
 You will be returned to the initial screen when you entered the mnemonic “GLBR”.

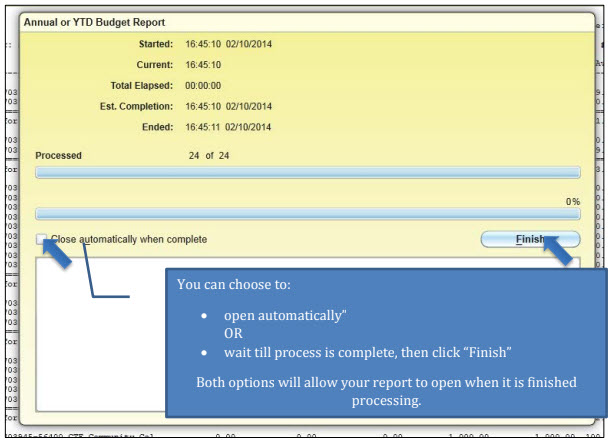
 The following screen appears to show you the progress of your report:
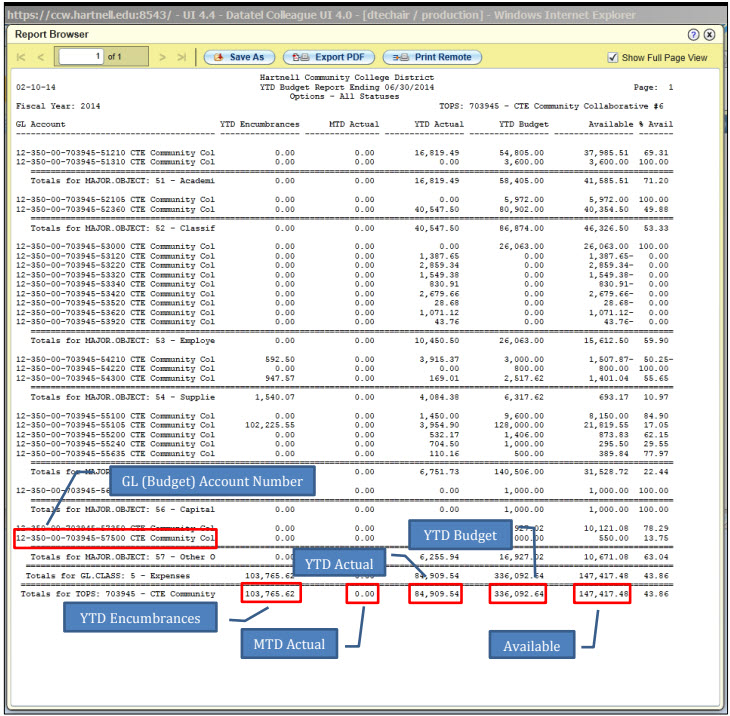
Your report will look similar to the one on the next page. From this report, you will be able to see:
- General ledger (budget) account number
- YTD Encumbrances = Purchase orders outstanding as of report date
- MTD Actual = Actual expenditures for the report month (in this example June ’14 = 0) • YTD Actual = Actual expenditures to date
- YTD Budget – Total fiscal year budget amounts
- Available = Available Balance including encumbrances (or purchase orders)
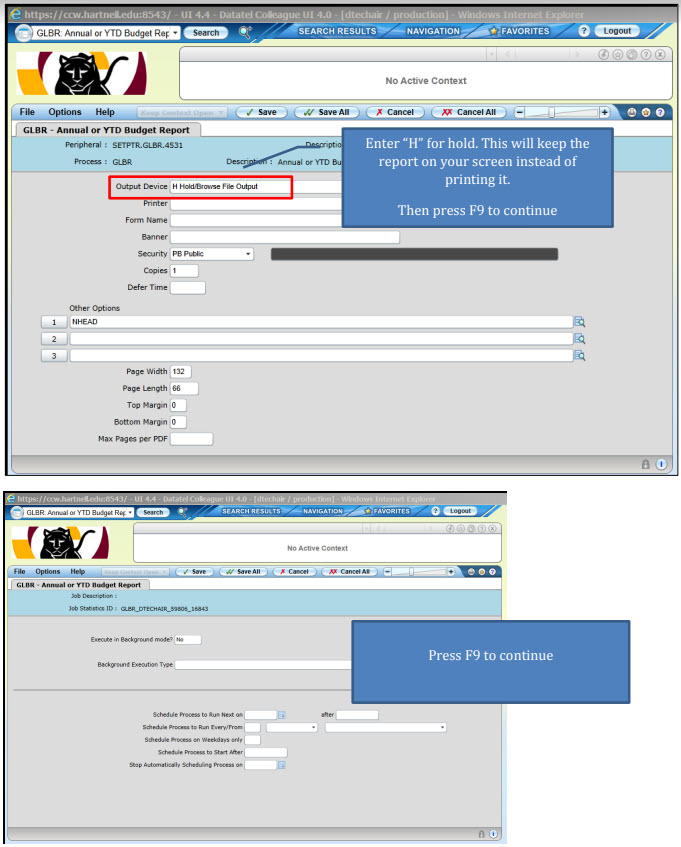
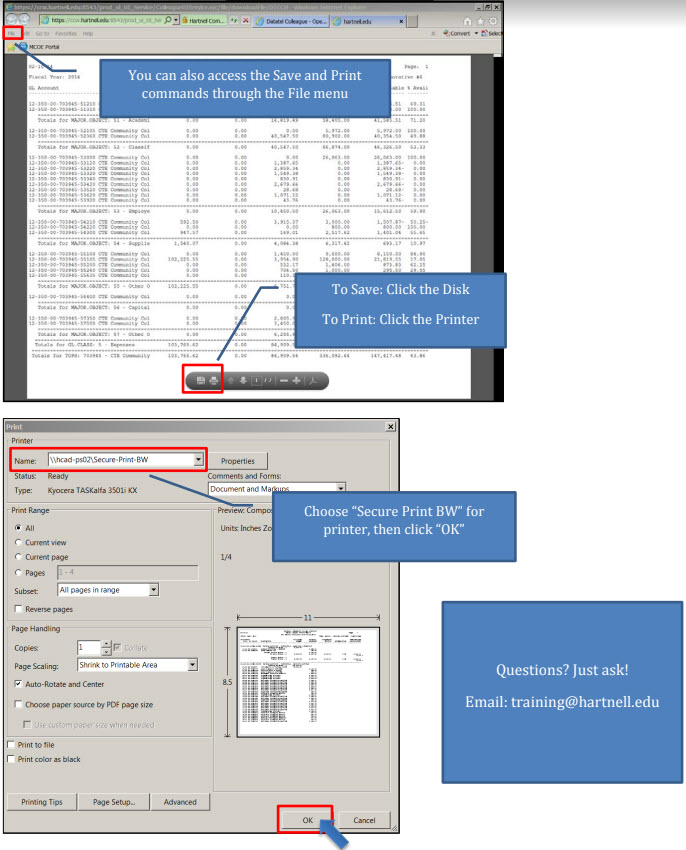
Note: Steps for saving and printing the report can be found in Step 6: Print or Save Report.
 Your report will look like the screen above. The columns are described below. See
the following pages for printing instructions.
Your report will look like the screen above. The columns are described below. See
the following pages for printing instructions.
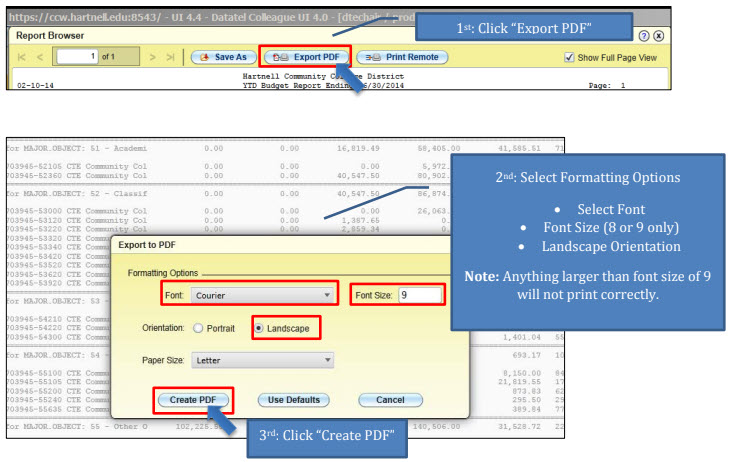
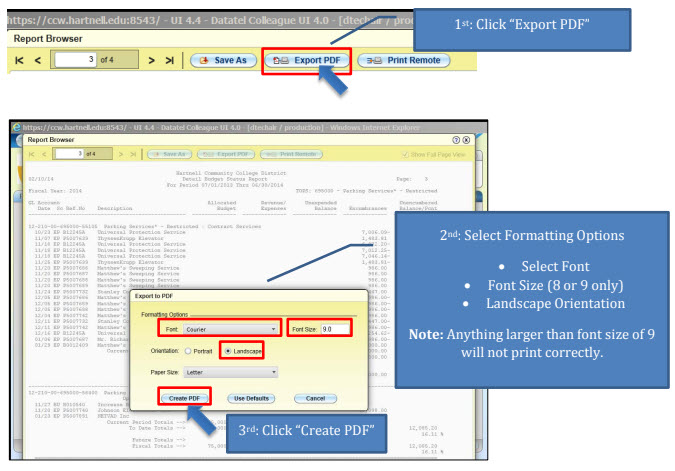
Create a PDF
- Click Export PDF
- Select Formating Options
- Click Create PDF
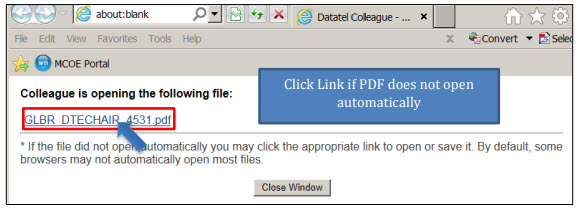
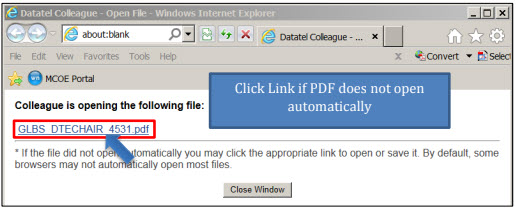
Open PDF
Click the Link if PDF does not open automatically.
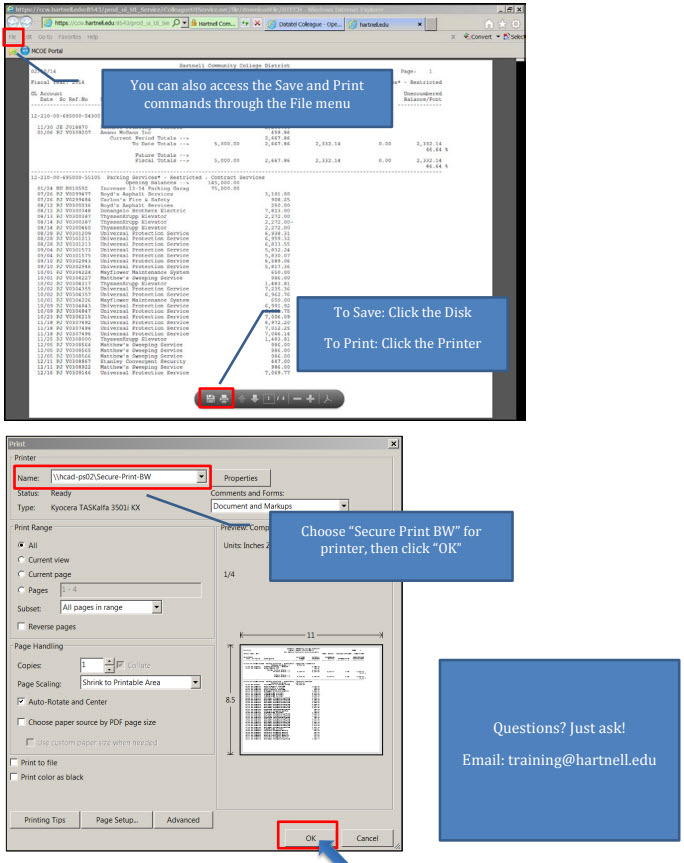
Save of Print PDF
- Select File
- To Save: Click the Disk
- To Print: Click the Printer
Ellucian GLBS (Annual or YTD) Budget Reports
View steps for running the GLBS budget reports. Please note: these items may be out of date, so if you still have questions, submit an IT Request in the Campus Services Portal.
Log-in to Colleague and type in the neumonic “GLBS” in the form search box, then press Enter. You can also select this report via the “Navigation” tab at the top of the screen.

Mandatory fields are highlighted in red.
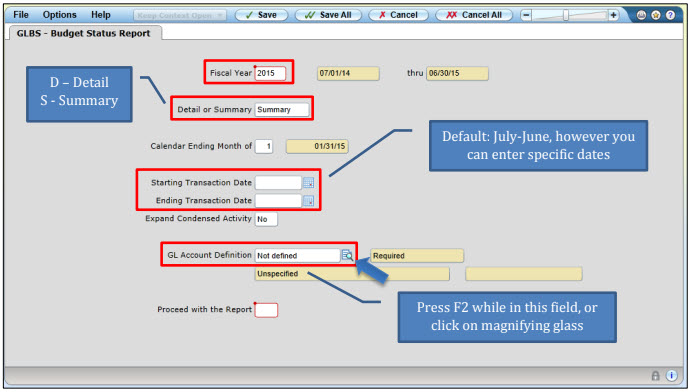 Determining the GL Account Definition
After pressing F2 or clicking the magnifying glass, you see the following screen. This screen is used to (first) select the data the report will contain (Select/List) and (second) how the report with be displayed (Sort).
Select/List: Pick The Data Your Report Will Contain
In the “Select/List” field, click the icon with the magnifying glass, or press the
F2 key. The following screen will open (see next page). On this screen you will determine
what data your report will contain. Input the fund, area, location, TOP, or Object
of the budget account you want in your report.
Example
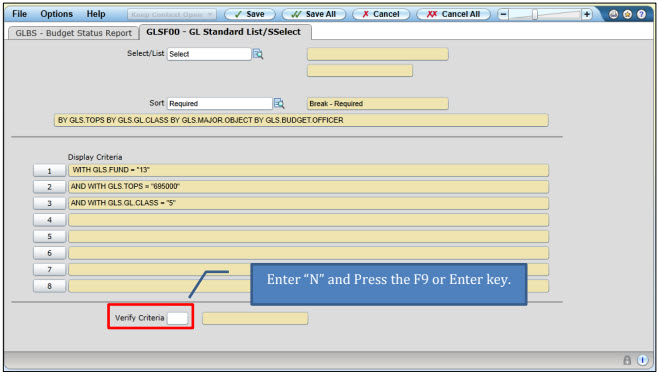
I want to run a GLBS report using the following information:
-
Fund 13 (Restricted funds/Grants)
-
TOP 695000 (Parking Services)
-
Object Code 5 (Expenses)
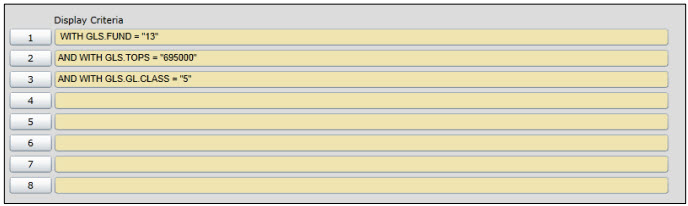
Please note: you can input any portion of the budget account number, but keep in mind that Colleague will capture only the accounts that include the codes you’ve input above (In this example, only accounts that have the Fund = 13, TOP code = 695000, and Object Codes = 5xxxx - Expenses).
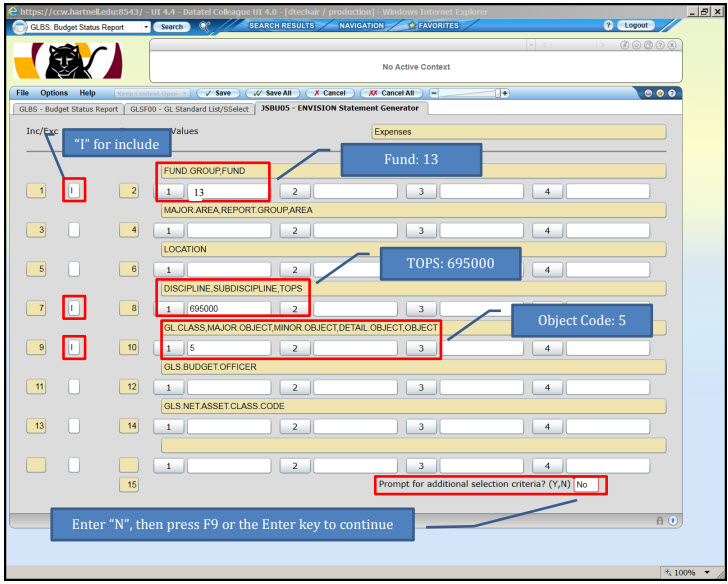 Once you press F9, or enter, you will return to the previous screen with your choices
filled in the “Display Criteria”, as seen below.
Once you press F9, or enter, you will return to the previous screen with your choices
filled in the “Display Criteria”, as seen below.
 Sort: Pick How Your Data Will Display
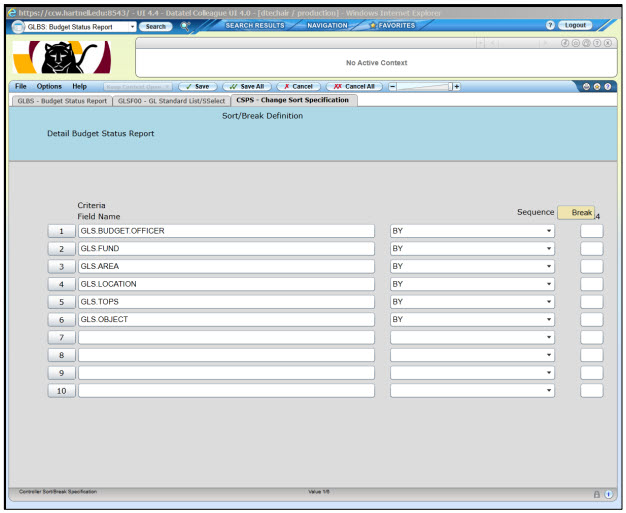
In the “Sort” field, click the icon with the magnifying glass, or press the F2 key. The following screen will open. On this screen you can adjust (or sort) how the report is displayed.
Example
I would like to sort my data based on the TOPS code. To do so, I need to delete:
- (1) GLS. Budget Officer
- (2) GLS.FUND
- (3) GLS.AREA
- (4) GLS.LOCATION
- (6) GLS.OBJECT
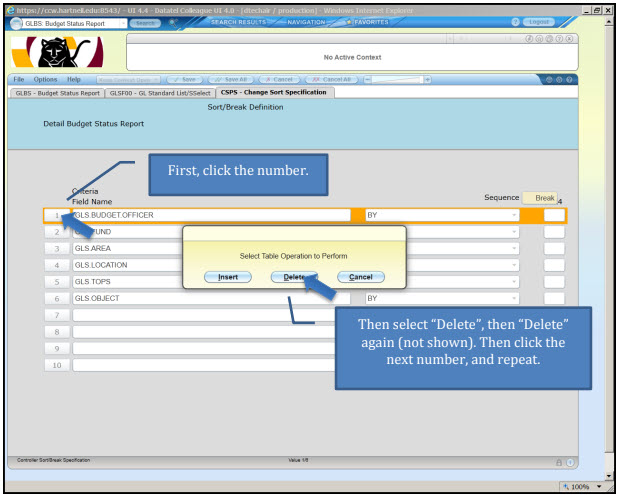
To delete these fields from the screen, I click the number, and then select “Delete”, and then “Delete” again. (see next page). Repeat until deleted 1, 2, 3, 4, and 6. In this example, we sort by the TOPS code (695000). This means the report will be sorted/displayed by all accounts with 695000 first. This is best when you are running more than one TOPS code. Please note: you can also sort by GLS.FUND if you run only one TOPS Code.
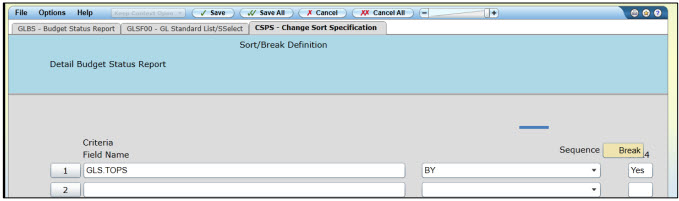
 After I have deleted 1, 2, 3, 4, and 6 – I will see the following screen:
 Next, I will add additional sort criteria. For this example, I want to add the following
additional sort criteria:
Next, I will add additional sort criteria. For this example, I want to add the following
additional sort criteria:
- Expenditures or GLS.GL.CLASS
- GLS.MAJOR.OBJECT
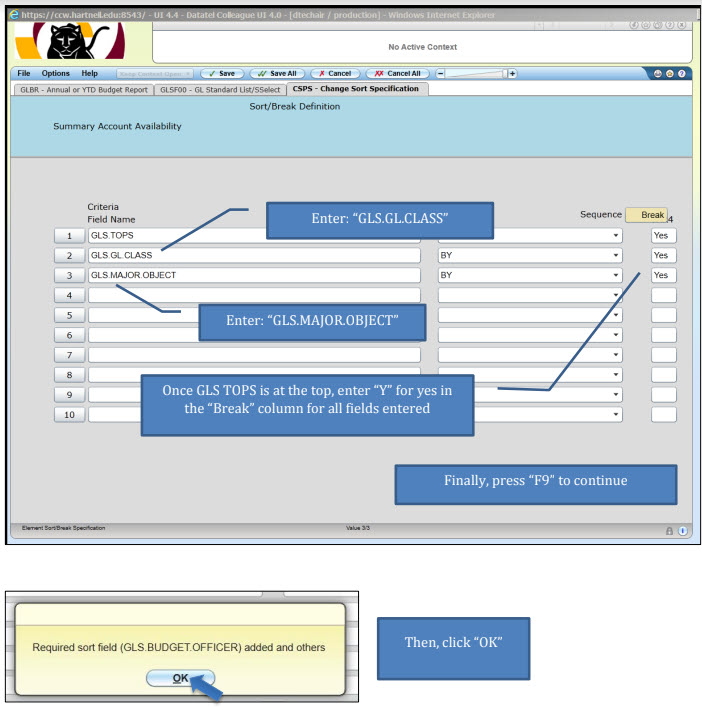
You will return to the previous screen with both the Select/List and Sort information populated.
 You will be returned to the initial screen when you entered the neomonic “GLBS.”
 The following screen appears to show you the progress of your report.
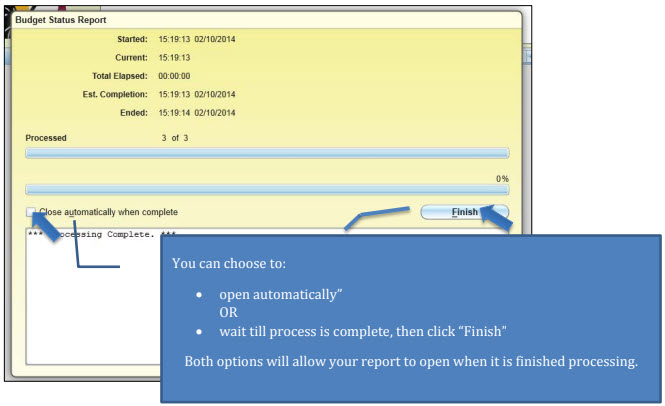
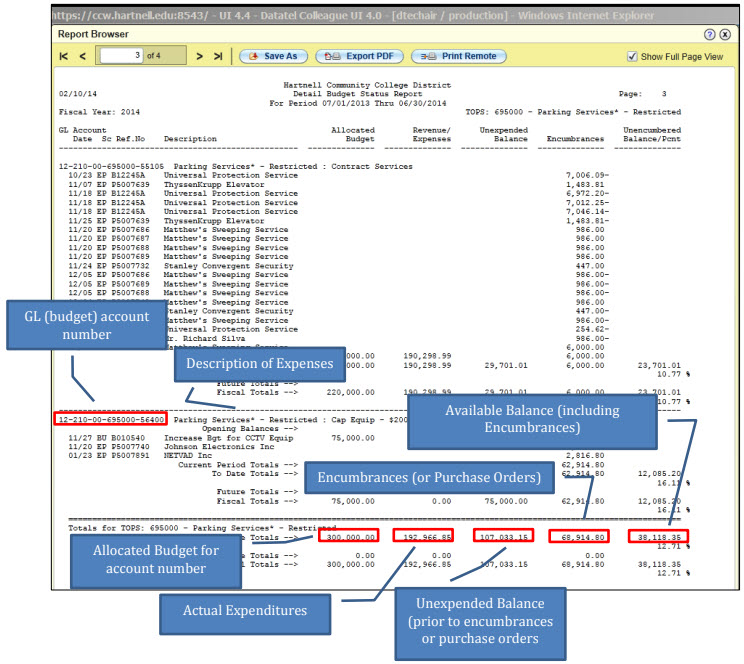
Your report will look similar to the one below. From this report, you will be able to see:
- General Ledger (GL) Budget Account Number
- Description of Expenses
- Allocated Budget
- Actual Expenditures
- Unexpended Balance (prior to encumbrances)
- Encumbrances (Purchase Orders)
- Available Balance (including encumbrances)
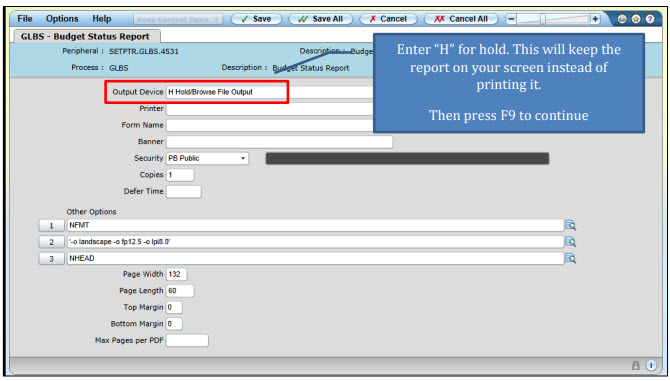
Note: See the next page for saving and printing instructions.
To print the report, you will need to first create and open the PDF version, and then print it.
Create PDF
- Click Export PDF
- Select Formatting Options
- Click Create PDF
Open PDF
Click Link if PDF does not open automatically.
 Save or Print PDF
- Click File
- To Save: Click the Disk
- To Print: Click the Printer

COGNOS
Cognos is an online reporting tool that can be used to extract data and generate reports. There are several publicly available reports to choose from, and you can learn more about these reports by clicking on the guide/video links below titled "Access Research Reports". If you have a Cognos account*, you can even generate custom reports! To learn more about the custom reports you can generate, check out the "Cognos Users: Custom Reports" guide/video linked below.
*To learn more about getting access to Cognos, contact an instructional technologist or register for training.
Guide
Cognos is an online reporting tool that can be used to extract data and generate custom reports. If you do NOT have a Cognos account, please contact dphillips@hartnell.edu.
- From anywhere on campus, visit http://collui.hartnell.edu:8888/ in your browser
- Click on “Cognos Reporting System”
- Click “Log On” in the top bar
![Cognos is an online reporting tool that can be used to extract data and generate custom reports. If you do NOT have a Cognos account, please contact dphillips@hartnell.edu. From anywhere on campus, visit http://collui.hartnell.edu:8888/ in your browser Click on “Cognos Reporting System” Click “Log On” in the top bar [Fig 1] Use your employee ID # and normal PAWS/computer password to log in Once logged in, your employee ID # will show in the upper right (if not, see notes) Click “Launch” and select “COGNOS Workspace Advanced” (if unavailable, see notes) Select the “EDW” file folder Click “Create new” (or “Open” to access pre-existing reports) Choose “List”, click “OK” Choose your data from the list to the right, and drag and drop into the list—you can delete any columns by right-clicking the column and selecting “delete” Use the filter icon to Edit Filters and Add new filters [Fig 2] Once you’ve customized your report, you can create a chart by selecting the Chart icon and choosing the type of chart to insert [Fig 3] Once you’ve finalized your report, generate a polished view of your final report by selecting the Run icon, or you can select the dropdown menu next to the Run icon and select the final output file (PDF, Excel, XML file, etc.) [Fig 4] Select any filters if desired, then click “Run Report” Once you see your final output file on the screen, hit the “Save” icon (if it’s a PDF, you may have to hover your mouse over the lower portion of the screen) To print your report, hit the “Print” icon, or print from your saved output file To save and use your report again, click “Save”](/pdc/guides/facultysupport/Images/fig1.jpg)
- Use your employee ID # and normal PAWS/computer password to log in
- Once logged in, your employee ID # will show in the upper right (if not, please contact David Phillips at dphillips@hartnell.edu)
- Click “Launch” and select “COGNOS Workspace Advanced” (if unavailable,please contact David Phillips at dphillips@hartnell.edu)
- Select the “EDW” file folder
- Click “Create new” (or “Open” to access pre-existing reports)
- Choose “List”, click “OK”
- Choose your data from the list to the right, and drag and drop into the list—you can delete any columns by right-clicking the column and selecting “delete”
- Use the filter icon to Edit Filters and Add new filters

- Once you’ve customized your report, you can create a chart by selecting the Chart icon and choosing the type of chart to insert

- Once you’ve finalized your report, generate a polished view of your final report by
selecting the Run icon, or you can select the dropdown menu next to the Run icon and select the final output file (PDF, Excel, XML file, etc.)
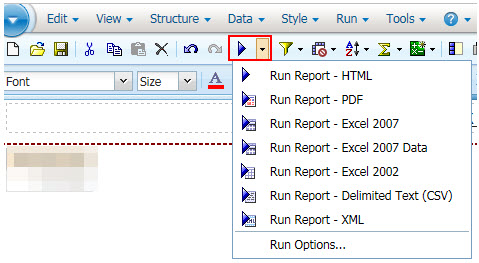
- Select any filters if desired, then click “Run Report”
- Once you see your final output file on the screen, hit the “Save” icon (if it’s a PDF, you may have to hover your mouse over the lower portion of the screen)
- To print your report, hit the “Print” icon, or print from your saved output fil
- To save and use your report again, click “Save”
Hartnell-Data Analytics Reporting Tools (DART)
- To access the public DART reports, open Internet Explorer or Chrome and go to www.hartnell.edu/cognos
- View the pre-created public DART reports by clicking the links below:
Tools
The Persistence and Success Tool provides data on a cohort of students who successfully pass a specified course in a specified semester and then continue on to persist in a second specified course during a given time frame. You can also choose a group of students who received a particular grade and see how they did in the second course.
This tool allows you to acquire the basic metrics for a Subject or Program by year.
The metrics are: # of sections offered, enrollment, scheduled capacity, contact hours,
percent of capacity, WSCH,
FTEF, and FTES.
This tool looks at a particular Program, either in aggregate or specific courses,
and reports the
enrollment, the # of students who were retained to the end of the semester, and the
number of students who succeeded with a "C" or better. The tool also divides the students
by modality (Face-to-Face, Distance, Hybrid). You can have a breakdown by demographics
(gender, age, ethnicity) and drill down to the course level.
This tool shows the number of awards given in the college (Degrees/Certificates) by program and type of degree. It also allows looking at the number of students declaring the major in the program and the number of them taking Core classes.
- Colleague Enrollment Reports: This shows the enrollment in a particular program by course over time in a semester.
- Colleague Section Reports: This shows the number of sections of a particular course by program offered over the last 10 years.
- Colleague Term Statistics Reports: This shows the number of FTES, Head Count, Enrollments, and Sections for the current semester, compared to the last 6 years.

Cranium Cafe
Web conferencing software for counseling, library services, and more! Training is offered through ConexEd (the developers behind Cranium Cafe).
 eLumen SLO Assessment
eLumen is the software that we use at Hartnell College for student learning outcome (SLO) assessment. Each semester, instructors use eLumen to report on SLOs, analyze data, and create action plans based on that analysis. Use the materials below to learn more about using this powerful tool!
Guides & Documents
eLumen Login: Use this link to login to eLumen and enter your SLO results
Assessment How-To Page: View additional resources and support information
Instructional Video
Note: you can skip the first 13 seconds of the following video as you are already on the correct page! To login, use the "eLumen Login" link above, under Guides & Documents.
Add Elumen Youtube Video
Link to Google Page ?
Or
Set up nested accordion?
Microsoft Office
Microsoft Office has multiple software programs that we use on campus, from word processing to creating slideshows and spreadsheets. View the training materials below.
GUIDES & DOCUMENTS
Microsoft Office 365 Training Center
Microsoft Office 2013 Training Center
INSTRUCTIONAL VIDEOS & TUTORIALS
 NetTutor
This is a live tutoring service provided through the OEI grant. NetTutor is already embedded in every Canvas course, so your students will have access as long as you publish your course shell!
Omni CMS

Pixlr
Pixlr is free photo editing software that you can use to edit photos like a pro! This guide is specifically designed for use with the online, self-paced Tech Tools course (register here). Review the Pixlr instructional video for more details and to see the tools at work!
NOTE FOR TECHIE FOLKS: If you are using Incognito mode or Private browsing, you will NOT be able to save your final image! If you don’t use private web browsing or don’t know what that means, don’t worry, you’ll be just fine!
Guide
- Go to www.pixlr.com
- Select “Pixlr X”
- Select “Open Image”
- Find your photo to edit:
- To edit your own photo, find and select it in your computer, then click “Open” (find free stock photos at https://pixabay.com)
- To edit a sample photo, navigate to the “Pictures” folder (under “Libraries”), select the photo to edit and click “Open”
- To add a layer, click the “Arrange” icon:

- Click the plus icon and choose “Image” to add a new image as a layer on top of your original image. Use the boxes around the image to resize the added image so that it falls within your image somewhere (for example, if your original image has a computer screen in it, you could add an image and place it over the computer screen so it looks like the screen is showing your added image). Adjust the transparency to have the original image show through.
- To crop your photo, click the “Crop” icon:

- Drag the outline to cut out parts of the image, hit “Apply”
- Change the overall width and height of your image (measured in pixels) to crop to a certain size, then hit “Apply”
- Straighten, rotate or flip your photo, then hit “Apply”
- Cut out & Adjust tools:
- These are more advanced tools that you can experiment with, but are not required for the assignment if you’re in the Tech Tools course!
- Filter & Effect tools:
- Select any filter or effect you’d like, and adjust the intensity with the slider bar, then click “Apply”.
- Liquefy, Retouch & Drawing tools:
- Use these items to adjust your image (like distorting parts of it or airbrushing items like blemishes out), then click “Apply”.
- Text, Elements and Image tools:
- Add items like text, stickers, or other images into your layer. Note for text: select from any of the styles and choose your font. In the textbox, type any text you’d like (your full name is recommended as a signature), then adjust the location of your text by dragging the text box around on your image.
- Once you’re finished editing your photo, click “Save” to the upper left of your screen
- For the tech tools assignment: rename your photo to include your name and the word “Edit”
- Set the quality at 100 (drag the bar to the highest setting)
- Click “Download”

Powtoon
Powtoon is an exciting free software that allows you to create short animated cartoons on any topic! Outside the classroom, use Powtoons to promote programs or services, introduce new employees, or build your brand. In the classroom, use Powtoons to get students interested in new topics, overcome anxiety, or get excited about field trips!
To get started, view the instructional video, create a storyboard for your new Powtoon, and follow the steps below.
Guide
Follow the steps in this quick start guide, or use the online support portal to learn the basics about Powtoon or delve into the advanced support features! Start with a free EDU Powtoon account.
- Go to https://www.powtoon.com/edu-home/
- Click “TRY IT NOW!” and enter your information, including your Hartnell.edu email address, then click “Sign me up”
- Click the verification link in your Hartnell email to confirm your new account!
- Log in at https://www.powtoon.com/account/login/
- Select “Templates” (top left)
- Choose your template:
- For this training, we recommend selecting the “Education” category, then “Teachers”, then use the free “Teacher Intro” template (towards the bottom)
- Click “Use” to start editing your Powtoon
Nice job! You’ve created a Powtoon and are ready to edit it!
There are many edits you can make to your Powtoon! Feel free to work your way down the list as needed:
- Edit the title of your Powtoon:
- Towards the top middle of your screen, edit the title by clicking and entering text, then click “Save”:
 Edit in “Full Studio” mode:
- “Full Studio” mode must be on to view the timeline and add items to your Powtoon (NOT “Quick Edit”). Toggle “Full Studio” mode on in the top left:
 The “timeline” is where you can see how long each slide will play, and at what time
each item will appear. You can see the timeline at the bottom of each slide.
The “timeline” is where you can see how long each slide will play, and at what time
each item will appear. You can see the timeline at the bottom of each slide.- Add seconds by clicking the “+” icon, or remove time by clicking the “-” icon
- Note how the total time of your Powtoon changes as you add/remove time:
 Add/Edit Background/Remove slides (called “scenes”):
- Add Scene: Click the “Add Slide” icon to the lower left:
- Edit Background: Click the “Background” icon in the right hand menu:

- Try a classroom-themed “location”, or even a fun seasonal location!
- Click “upload background” to use a photo on your computer.
- For a blank background, select “Pick a color” and select black or white.
- Remove Scene: Click the slide to remove, then hover your mouse over the selected slide until the trash icon appears. Click the trash icon to delete.
- Add/Edit text: (NOTE: the timeline must be “on” to add/edit text.)
- Add Text:
- Click the “Text” icon in the right hand menu:

- Select any of the insert text options, and position it both on your scene AND in your timeline (view the instructional video for more details)
- Click the “Text” icon in the right hand menu:
- Edit Text:
- Edit the text itself by typing/deleting
- Use the edit toolbar that appears to change the size, font, color, and more!
- Add Text:
- Add/Edit/Remove a character: (NOTE: the timeline must be “on”.)
- Add Character:
- Click the “Characters” icon:

- Select any free character you want, and position it both on your scene AND in your timeline (view the instructional video for more details)
- Click the “Characters” icon:
- Edit Character: Click the character, then use the white boxes to resize, or drag to place the character
anywhere within the scene. To make other changes, click the following icons along
the side of each character:
- “Pose”: Click to see the available pose options for your character. You can change their expression or the activity they’re performing in the shot.
- “Swap”: Click to replace your character with a new one.
- “A>B”: Click to show where your character will move. For example, you can make your character move from its original location to the left of the screen to the right to show some kind of progression.
- “Animations”: Change how your character behaves. For example, if your character has the “waving” pose, you may want them to wave for the entirety of the scene (the “play in loop” option), or you may want them to wave twice before stopping. This is where you can make those changes!
- “Flip”: This flips your character horizontally, like a mirror image!
- Remove Character: Click the character to remove, then tap the “Backspace” or “Delete” key on your keyboard.
- Add Character:
- Add/Edit/Remove a prop: (NOTE: the timeline must be “on”.)
 Add prop:
- Click the “Props” icon:
- Select any free object you want, and position it both on your scene AND in your timeline (view the instructional video for more details)
- Edit object: Click the object, then use the white boxes to resize, or drag to place the object
anywhere within the scene. To make other changes, click the following icons along
the side of each object:
- “Swap”: Click to replace your object with a new one.
- “A>B”: Click to show where your object will move. For example, you can make your object move from its original location to the left of the screen to the right to show some kind of progression.
- “Flip”: This flips your object horizontally, like a mirror image!
- Remove object: Click the object to remove, then tap the “Backspace” or “Delete” key on your keyboard.
- Preview your final Powtoon:
- Click the “Play” icon to the lower left of your screen:
- Click the “Play” icon to the lower left of your screen:
- To share, click the “Export” button (top right):

- Share one of two recommended ways:
- My Powtoons:
- After clicking “Export”, click “My Powtoons”, then adjust the title, category & description (if necessary)
- Click “Next”, then click “Export PowToon”
- You should now see your published Powtoon! Copy the link in your address bar to share or post in your Canvas course.
- YouTube:
- My Powtoons:
-
-
- After clicking “Export”, click “YouTube”, then click “Add Account” to sign in to your Hartnell Gmail account (Gmail is linked to YouTube)
- Set the privacy: “Public” means fully public, “Unlisted” means only those with the link can view, and “Private” means only you can view. Choose “Unlisted”, then click “Next”.
- Leave the standard settings (“Public” here means your video will be visible on Powtoon, which is the only free option), then click “Next” again, then click “Upload PowToon”
- When the video is uploaded, you will receive the YouTube link via email! Share the link or post in a Canvas course to embed the video.
-
That’s it! You’ve successfully created an account, created and edited a Powtoon, and shared the
link!
![]()
Prezi
Prezi Getting Started & Support Portal: Use this web portal to learn how to get started or search for specific support items. Get started with a Prezi Basic (free) account.

Screencast-o-matic
Screencast-o-Matic allows you to record your screen, webcam, and voice as a video file. Use it to capture lectures or create tutorials—it’s available on the PDC virtual desktops! If you’re willing to buy the premium version (~$18 per year), you’ll gain access to great video and audio editing tools as well.
Guide
- Login to the PDC virtual desktop on campus and select “VMware Horizon HTML Access”
- Click on the Screencast-o-Matic icon on your desktop
- Select “Launch FREE Recorder”
- Set your recording options:
- Record: Choose to record your computer screen, webcam, or both
- Max Time: You can record up to 15 minutes of content if you’re using the free version, but you’ll have unlimited recording time if you follow Step 2!
- Size: Select “Active Window” to record only the window you have open on your screen. IE, if a PowerPoint presentation is playing while you record your screen, the PowerPoint presentation is the “active window”. Or, you can select “Full Screen” to record your entire screen. You can also use the arrows in the corners of the black and white borders to resize the recording window.
- Narration: If you’re on a thin client on campus, you’ll need a USB headset with a microphone
to successfully record yourself speaking. If you’re using a Hartnell laptop with a
built-in webcam, there’s also a built-in microphone. You’ll see green bars when you
speak if a microphone is detecting sound:

- Computer Audio: This is only available in the premium version, and will allow you to capture sounds from your computer like mouse clicks, etc.
- Once your options are set, click the red “Rec” button to begin recording! You will have a 3 second countdown before it starts recording, and you’ll see the recording time in the bar next to the blue pause button.
- To stop recording, click the blue pause button, then select “Done”. To pause recording,
click the blue pause button, then continue recording by hitting “Rec”. To delete your
recording and start over, click pause, then click the trash icon:

- Once the recording is finished, click “Save as Video File” and set your options:
- Type: MP4 is the default, and that’s exactly what you want!
- Filename: Type in the name you want for your video
- Folder: Save this somewhere you’ll be able to find easily later!
- Cursor: You can highlight your mouse cursor with a yellow circle, or remove the circle with“Just Cursor”, or hide the cursor with “No Cursor”.
- Open Captions: For now, leave the captions set to “None”. You will caption your video once it’s published on YouTube!
- Publish: Click “Publish” to save your video, then click “Done” when it’s ready.
That’s it! Your video is now ready to upload to YouTube!
- Go to https://screencast-o-matic.com/education to register for a premium account
- Select “Solo Plans for Teachers”, then “Solo Deluxe” (recommended), choose your subscription length, enter payment information and click “Subscribe”
You can now access the video editing features in Step Three (below).
- Open Screencast-o-Matic, select “I have a Solo Plan”, then sign in using your email address and password set up in Step Two.
- To start recording, click the red “Record” icon and set your options (like Step One)
- Complete your recording and click on “Edit” to the lower right
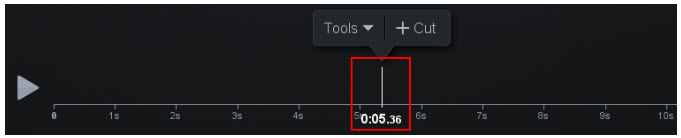
- You can now add “edits” to your video by clicking anywhere along the timeline, which drops a “playhead” where you clicked (at 0.05.36 seconds below):
- Once you’re ready to make an edit, click the “Tools” button to see your options:
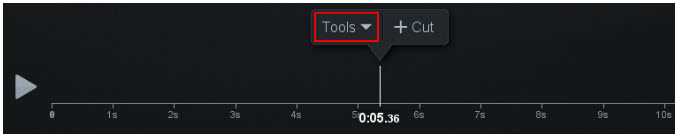
- Select the edit tool, then drag the bar along the timeline to make changes:
- Cut: this deletes content.
- Copy: this copies content, which you can then paste anywhere into the video.
- Hide: this allows you to hide your mouse cursor or your webcam.
- Insert: this inserts video into the current recording (like other recordings, etc.)
- Narrate: this allows you to record yourself speaking and adds it to the video.
- Overlay: this allows you to add images, a blur effect that you can size (to blur out student ID numbers, for example), an outline around specific items, arrows, a highlight (which grays out everything except what you add highlight to, which you can also add zoom to zoom into a part of your screen), or a text overlay.
- Replace: use this to replace a portion of the video with another video, or freeze the video screen exactly where it is.
- Speed: speed up or slow down a portion of your video.
- Transition: adds a transition to the beginning or end of the video (like PowerPoint). Typically used to fade out the end of the video.
- Volume: increase, decrease, or mute a section of your video. Great for getting rid of those “um” and “uh” vocalizations.
- Once your edits are complete, click “Done” and save as a video file. You should now have the option to save with “higher quality”, which is always recommended. Click “Publish” to save your file, then upload to YouTube to distribute!
Smarthseet
Smartsheet is a multifunctional tool that can be used as a to-do list, project management
tracker,
spreadsheet, and calendar. It is available online so you can use it anywhere, and
the free app can be
downloaded onto your mobile device. To use your Smartsheet effectively, you can use
this guide to take you
through some of the most useful basic features. Follow along with the task directions
and you’ll have a test
sheet that you can work on or start fresh after the training. Let’s dive right in!